

Pavlova is a truly delicious dessert that was once created to honor the famous Russian ballerina Anna Pavlova. It is in its mini format as it is most appreciated, really attractive and perfect for a diner. It is usually decorated with fruit and some cream filling. This time we are going to fill it with a strawberry cream, but do not hesitate to put your favorite filling, be it lemon curd, pastry cream or the one you like best.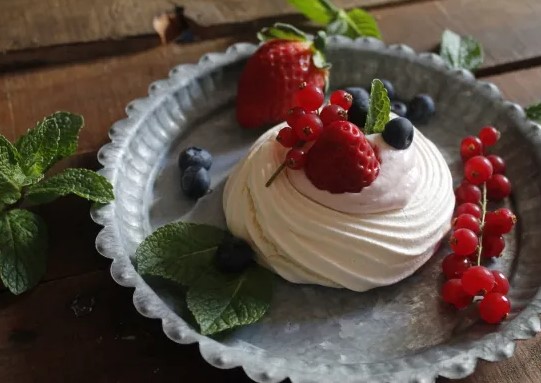
Although it is a very attractive dessert, the ideal is to eat it completely chopped to contrast the sweetness of the meringue with the cream, which should not be too sweet, and the acidity of the red fruits. The mixture I assure you is delicious. From this article, we encourage you to try this wonderful dessert, since it will not leave you indifferent, so keep reading to discover how to make mini pavlovas.
Ingredients to make Mini Pavlovas:
- For the meringue
- 3 egg whites at room temperature
- 200 grams of sugar (1 cup)
- 1 dessert spoon of lemon juice
- 1 dessert spoon of vanilla essence
- 1 tablespoon cornstarch
- For the filling:
- 150 milliliters of whipping cream (¾ cup)
- 150 grams of strawberry jam
- 75 grams of Philadelphia type cream cheese
- To decorate:
- 125 grams of mixed red fruits
How to make mini pavlovas
- To make our mini pavlovas, first we are going to prepare the meringue.
- To do this, we put the egg whites at room temperature in a large bowl and beat them at high speed with an electric whisk.
- When they form soft peaks, gradually add the sugar.
- The meringue will be ready when strong peaks form.
- When lifting the whisk, the whipped whites will not fall, this being the indicator that our homemade meringue will be well formed.
- Preheat the oven to 100ºC. Once this is done, it is time to add the lemon juice, liquid vanilla and cornstarch to the meringue.
- Mix gently with a spatula but integrating all the ingredients of the mini pavlovas well.
- Line a tray with baking paper.
- Pour the meringue into a pastry bag with a star-shaped nozzle and form not very large nests on top of the tray, separated from each other, as they tend to grow in the oven.
- We bake the homemade pavlovas with heat up and down for one hour at 100 ºC. Once baked, let them cool on a wire rack.
- Trick: We have to make a nest shape to later be able to put the filling in the central hole. Mini pavlovas can be made several days in advance and stored in an airtight tin.
- Now we go with the filling.
- To do so, in a large bowl we put the whipping cream, jam and cream cheese and beat with an electric whisk until everything is well integrated.
- We put the filling in a pastry bag and let it cool or reserve until serving time.
- Although you can fill the mini pavlovas in advance, it is always preferable to fill them shortly before consumption. Take the pastry bag with the filling out of the fridge and fill each of the nests.
- Tip: If the central hole has closed when baking, we drill a little so that they can be filled.
- And now we only have to decorate the mini pavlovas with the desired red fruits and with some mint leaves.
- Without a doubt, the red fruit pavlova is one of our favorites.
- We reserve the desserts in the fridge until the moment of consumption.
- Now that you know the recipe for mini pavlovas, cheer up with various fillings and different decorations.