

Chocolate cones filled with dulce de leche. You should know that there are varieties of cones: bathed in white chocolate, filled with added dried fruit or with a touch of some alcoholic beverage, among others.
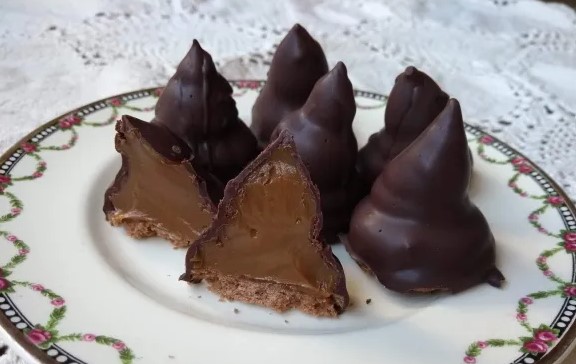
But this time, in this article, we are going to teach you how to make traditional chocolate cones made with a chocolate cookie base, a generous dulce de leche cone and a delicious dark chocolate coating. Are you ready? Let’s cook!
Additional features: Average cost, Recommended for vegetarians, Salt-free recipe, Baked recipes, Argentine recipes
Ingredients to make Chocolate Cones:
- For the base
- 150 grams of ointment butter
- 50 grams of sugar (¼ cup)
- 50 grams of honey
- Orange zest
- lemon zest
- 1 egg
- 1 Teaspoon vanilla extract
- 250 grams of flour 0000
- 50 grams of corn starch
- 20 grams of bitter cocoa
- 1 dessert spoon of baking powder
- ¼ dessert spoon of baking soda
- For the filling
- 2 kilograms of pastry dulce de leche
- For coverage
- 400 grams of semi-sweet pastry bath
How to make Chocolate Cones:
- To start with the chocolate cones recipe, you must first place the softened butter together with the sugar in the mixer bowl. Next, beat until it forms a kind of cream.
- Add the egg, honey, vanilla essence, lemon and orange zest. Continue beating a little more.
- Sift together the dry ingredients: flour, cornstarch, bitter cocoa, baking powder, and baking soda.
- Add the dry ingredients to the preparation and integrate the little with a spatula.
- Next, finish unifying the dough with your hands, but without kneading.
- Trick: it is important not to knead too much since, if the dough develops gluten, the lids can become rubbery.
- Place the dough between two plastic wrap and stretch3 or 4 mm. Then, place it on a plate and take it to the fridge for at least 2
- When the dough is very cold, cut the caps with a circular cutter 4 cm in diameter. To use the dough remains, join them without kneading by stretching again between plastic wrap. Continue cutting.
- With these ingredients, approximately 60 tapas come out. Therefore, once cut, you can reserve the ones you are not going to use that day.
- They keep for 2 or 3 days in the fridge and 2 or 3 weeks in the freezer. A longer time is not recommended, as the raising powders can give the dough a bad taste.
- Place the circles on greased plate or covered with silicone or parchment paper.
- Do not place them too close together, since in the oven they will increase a little in size.
- Also, take them to the oven preheated to 170 ° C between 8 and 10 minutes. When you touch the surface and no fingerprint is marked, they will be ready.
- When all the tapas are cooked, let them cool on a wire rack.
- Tip: if you are not going to use them at the moment, keep them in a well-tight container so they do not get wet.
- Place the pastry dulce de leche in a2 cm sleeve with a smooth nozzle and then make a flake over each cookie and place them back on the rack.
- To make the flake, place the tip near the cookie without touching it.
- Then, press down on the dulce de leche without moving the nozzle. When the candy has covered the cookie, slowly lift the bag up and continue squeezing to the height you want, stop pressing and lift to form the peak.
- Tip: for each cone we have used about 35 grams of dulce de leche.
- Melt the pastry bath and bathe the cones. Then let it dry at room temperature.
- Now you can enjoy these delicious chocolate cones with family and friends. To eat! If you wish, share with us your opinion or photograph of the final result